

El Niño or not, it's springtime in the Northern Hemisphere and the tulips and daffodils are poking up around our toes. The magnolias are ready to pop and the cherry blossoms aren't far behind.
No matter where in the world you live, it's time to grab your camera, don your April-showers raincoat, and get out there among the beautiful spring flowers. (Okay, if you're in the Southern Hemisphere, it won't be spring for six months. But let's not quibble.)
Before we get into some Advanced Techniques you can use in your photographs of flowers, if you haven't done so recently we suggest you review the Basics of Flower Photography presented in an article in this site's Reference Shelf: "How to Take Great Photographs of Flowers." If you've never read that article, do so now. It's full of Basic Concepts on which we're going to expand in this article. Read it...then come back!
Okay. Now that you've read or reviewed that article, let's move on and look at some other things you can do.

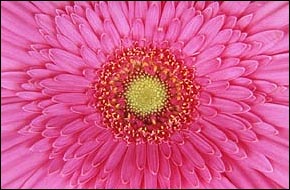
When we photograph a flower close up - whether growing in a garden or peeking out of a vase - we often use selective focus. In other words, we shoot with a wide aperture (low ƒ-number) to throw the background out of focus so it doesn't distract attention from the flower. This is a common technique that usually renders the background in muted green (of other plants) or blue (of the sky).

But the background need not be confined to these muted colors. It's possible to add drama and a sense of the unexpected by inserting a different type of background into the photograph, like this:
These graceful white lilies pop out in this photograph because of the deep red background. Are these lilies in a garden or a vase? We don't know. All we see are the flowers against the solid-colored background.
How can you produce such a solid-colored background in your flower pictures? Simple. Place a colored panel behind the flowers! A panel of photographic seamless paper. A panel of art-supply construction paper. A panel made from a sheet or pillowcase. Anything. Choose the color you like - and place it as a panel behind the flowers. Indoors, you may need some tape or thumbtacks to fasten your background to a wall. Outdoors, you may be able to prop your background up against other flowers in the garden...or you may have a friend or assistant hold it in place.
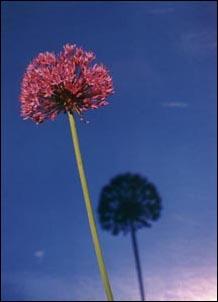
Shadows and reflections can be part of the photo. In the picture to the left, NYI Instructor Jerry Rice used glossy blue paper as the background. At first glance, you might think this is the blue of the sky. But then you see the heavy shadow of the flower. The shadow helps make this picture! It's a wonderful part of the composition. And we know that you don't see shadows like this in the sky.
What color background? You are limited only by your imagination and the availability of supplies. Our suggestion: Use a background color that contrasts with the color of the flowers. If the flower is red, don't use a red background...etc. Neutral colors like gray, black, white, and beige are good if the flower is very colorful. If the flower is a neutral color - like the white lilies, above - a more vibrant background color is usually better.
What lighting? Any light source can do. If you're outdoors, consider natural sunlight. Indoors, you'll probably use flash. Just be aware of the possibility of a hard shadow, and decide in advance if you want your picture to include that shadow, or you want it to be outside the frame.
NYI Dean Chuck DeLaney reports that in warm weather he wanders out after dark and shoots flowers using only his on-camera flash, as in this picture of June-blooming peonies. The concentrated light of his on-camera flash gives sharp definition to the flowers. Further, because it's pitch-black out, the background is usually totally dark.

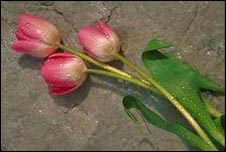
Other backgrounds. Don't overlook other possible backgrounds. Perhaps you want a background that has texture, like the slate in this picture. (Hint: To bring out texture, have your lighting come from the side.)

Or you may look for an interesting locale, as in this picture - a fine example of "Flowers with..." Here we see the tulips with...a windmill. The entire image is given added impact by the red sunset sky that silhouettes the windmill and the trees. (We quibble with the composition of this picture since the top half seems unrelated to the bottom half. It's as though it were artificially added in the darkroom. In reality, it was not!) In terms of lighting, note one thing: The natural light of the sunset sky was not sufficient to properly illuminate the foreground tulips. So the photographer added light to them with a small flash, but made sure the exposure was long enough to capture the windmill and sky too.
Interesting angles. Whether you're photographing flowers indoors or "au natural," consider unusual angles. In this picture the humble spring Crocus never looked more dramatic nor loomed larger. Why? Because the photographer got down low to exaggerate the flower's height. He also came in close to make them loom large. To get down this low, all you need is to be willing to bend over or lie down. To get this close, you need a macro or close-focusing lens. If you don't have such a lens, SLR users can consider getting a set of close-up filters which attach to your lens like regular filters, but provide magnification that allows you to get very close to your subject. A set of three such filters - each offering a different degree of magnification - costs about $40. (Caution: Make sure you purchase a set that fits the diameter of your basic lenses.)


Here's another interesting angle. In this picture, instead of using a close-focusing lens, the photographer did just the opposite - he used a wide-angle lens. And he shot from up high to look down on the flowers in the foreground. From this angle with a wide-angle lens, he can capture the flowers in the foreground as well as the mountains and blue sky in the background.


Showing droplets. Here's a tip from Sharon Gumerove, NYI's Webmaster, who loves to photograph flowers: If possible, show droplets of dew on a close-up view of a flower. The dew connotes an early morning view in a quiet garden. In fact, we used to get up extra early just to capture that dew. Then Sharon told us a trick she learned a while back: She gets up late and brings along a spray bottle filled with water and creates her own "dew" any time of day! As an alternative, some photographers use drops of glycerine (bought at the local drug store) because it won't evaporate as fast.
The main idea we want to impart to you in this article is that there are lots of opportunities for you to experiment when you photograph flowers. Look for creative and unexpected approaches. For example, we've seen interesting photographs of dead flowers, dried flowers, out-of-focus flowers, even underwater flowers. Point: Let your imagination roam. Most flower pictures are mundane. Look for the unusual. Experiment!
The more you experiment, the more interesting, exciting and gratifying your flower pictures will be.
Flowers are one of natures most beautiful aspects, learnhow to capture it in the best possible way at NYIP.


