

NYIP's newest student advisor, George Delgado, is a professional photographer, and an NYIP graduate. In addition to running a portrait and wedding photography business here in New York City, George has a wide variety of experience in business and an extensive background in the aviation industry including stints as a pilot and aviation instructor. In his first article for NYIP.edu, George takes up the issue of metering for proper exposure. Welcome George!
We've had a lot of questions from students about using their camera's built-in light meter. Here's an overview which we hope will give you a basic understanding of the subject. We're going to cover three aspects of in-camera metering; a General Overview, Metering Modes, and some Tricks and Tips to Use of Your Camera's Light Meter more effectively.
General Overview — What your Camera's Meter "Sees"
Light meters are color-blind. The light meter sees every scene as if it were an average, medium gray, halfway between black and white. So the meter always assumes that the scene is average in tone and reflectance. In many scenes, that's OK. As long as the light and dark areas in the scene are within the exposure latitude of the film or the digital camera's sensor you'll probably get an acceptable exposure. Bright highlights in one part of the frame may be balanced by dark shadows in other areas, as well as mid tones that fall between the extremes, and the overall average may be that medium gray that the meter thinks it's looking at.
But when you frame a subject in the viewfinder, the camera's light meter has absolutely no idea whether you are photographing a blonde bride in a pure white wedding gown against a pale background on bright day, or a black bear in a very dark shady forest. All the meter "sees" is how much light is striking its sensor, and it assumes the scene averages out to medium gray. And with pale brides or black bears, that can lead to exposure errors. In its attempt to render every scene as medium gray in tone, the meter will tend to overexpose dark subjects, making them appear lighter and underexpose light subjects, making them look darker.
One of the ways to get better exposures is to meter a gray card, rather than the subject. The meter's assumption that the scene is medium gray will be matched by having the meter actually measure light reflected off a medium gray card. Just make sure the light hitting the card is the same quality of light on the subject, and you should get a good exposure.
Metering Modes
Let's move on to discuss Metering Modes. The metering Mode determines which part of the frame the light meter is reading and how the meter is going to calculate "correct" exposure. By selecting the best metering mode you may be able to fine-tune the reading to better suit your subject matter. Camera manufacturers may use different words to describe these modes, but the three basic choices are Evaluative , Center-Weighted Average, and Spot.
Evaluative metering — also called Matrix Metering — depends on complex algorithmic calculations performed by your camera's computer chip. It breaks the scene down into individual segments, measures the light in each segment, and compares it to templates programmed into the cameras computer chip. If it "sees" that the upper 2/3 of the scene averages 2 stops brighter than the bottom third, and that there's fairly constant line of demarcation between the two, it may say "aha — I bet that's a landscape and the top is sky and the bottom is land. I have an algorithm to calculate exposures for landscapes, so that's what I'll use". So, as the name Evaluative Metering indicates, in this mode the light meter is programmed to evaluate the scene, look for a corresponding template, and apply that template to the exposure calculation. It works surprisingly well most of the time, but it's far from foolproof.
Center Weighted Average (CWA) is a less sophisticated approach that assumes whatever is centered in the frame is the main subject, so it calculates an average that gives more importance to whatever is in the middle of the frame. That's probably good for many "snapshots" but if you are composing your photographs artistically, the most important element in your composition may be off-center, following the Rule of Thirds or your own sense of artistic composition. In that situation CWA may give you an incorrect reading.
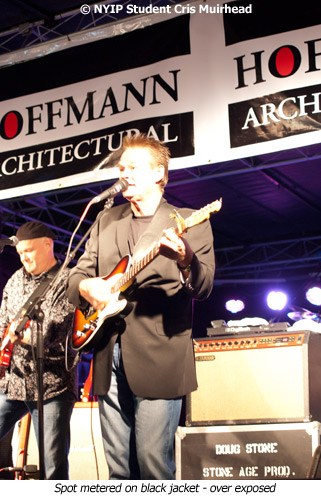
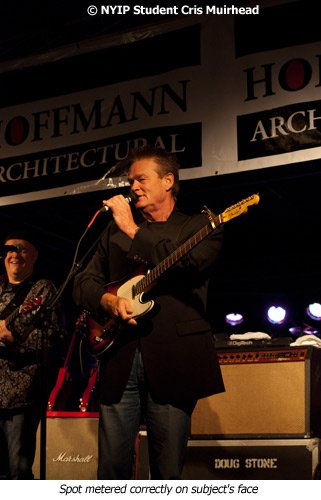
Finally, there's Spot Metering. In the Spot Metering mode only a tiny area of the frame is metered, typically just 2% to 4% of the whole scene. Most cameras (read your User's Manual to understand how your particular model works) let you choose which of the focus points will be metered, allowing you to compose your photograph in the viewfinder and meter just the area immediately around the focus point you have selected, and ignoring the rest of the exposure information in the frame. Remember the blonde bride in a white dress against a light background on a sunny day? Many portrait and wedding photographers have learned that spot-metering the subject's cheek, just below the eye, gives them a good reading in what can be a challenging situation.
Whichever mode you select, the general goal is to "center" the indicator in the viewfinder for a good exposure. As a creative photographer you also have the option of "tweaking" the exposure by changing the aperture or shutter speed to deliberately under or overexpose the image a bit to achieve a better result. Moving the indicator to the "plus" side by slowing the shutter speed or opening the aperture increases the exposure and will lighten the image; moving the indicator to the "minus" side by increasing shutter speed or closing down the aperture will reduce the exposure and the image will be darker.
Tips and Tricks
1. Use a gray card when you are in tricky lighting situations. You might think that this technique would work well with brides, but not with bears. Not so. While you can't get the bear to hold a gray card for you, you can meter the gray card without approaching the bear — just get the card in the same kind of light and it will give you an accurate exposure reading.
2. Meter what matters most. If you are photographing a scene that has a high dynamic range of more than 8 or 9 "stops" of exposure difference between the lightest and darkest area, it may exceed the exposure latitude of your film or digital sensor. So you may have to decide what is most important and expose for that part of the frame. If you're doing portrait photography, the subject's face is probably the most important part of the composition. Spot Meter the subject's cheek, or fill the viewfinder with your subject's face by zooming in or walking up to the subject, manually set the exposure, then move back to reframe the subject. Don't worry if your camera won't focus on the subject if you get too close. The light meter is independent of focus, so it will still give you a good reading, even when you're too close to focus. At a wedding, it's more important to capture the detail in the bride's white dress than to preserve shadow detail of the groom's black tuxedo, so you can choose to expose for the highlights, and not worry about the shadows being too dark.
3. Learn to see and understand challenging lighting situations. Use your training and judgment. Is the scene you have framed in the viewfinder much darker or lighter than medium gray? Classic examples of images that are lighter are white snow or powder sand beaches. In those situations, you know that the meter may be "tricked" and your image could be underexposed if the meter needle is centered. You may need to move the needle a click or two to the "plus" side by opening the aperture, slowing the shutter, or increasing ISO. Scenes that are darker than medium gray — the black bear in the woods — may come out overexposed and you'll need to move the needle a bit to the "minus" side by selecting a smaller aperture, faster shutter speed, or lower ISO. Warning! While many in-camera meters follow the standard convention of "plus" being to the right of center, and "minus" being to the left, one major manufacturer switches that around, so be sure to check if you are using a new camera for the first time!
4. Use the histogram on the back of your camera if you're a digital shooter, to supplement the information the meter is giving you. Is the histogram way off to the right or left? This will tell you if you are losing detail on the highlight or shadow areas of the image, and you can adjust your exposure accordingly.
5. Bracket your exposure. When in doubt, consider bracketing your exposure, taking three successive images, one with the meter needle centered, one deliberately "overexposed" and a third deliberately "underexposed". With most modern SLRs you can choose Auto Exposure Bracketing, and the camera will do the work of changing the exposure settings for you. Be aware that there's a big extra cost to bracketing. Film photographers will triple their film and print costs, using up three frames instead of one, and digital photographers will use three times more memory and may spend three times longer in their post production efforts. If you are editing 3,000 frames from a wedding or vacation trip, instead of 1,000, that's a lot of extra money, time and effort!
Proper exposure is elemental to good photography. We hope this overview on using your camera's built-in light meter will help you "nail it" more consistently.


