We hope you enjoy these digital photography tips created by the New York Institute of Photography - America's oldest and largest photography school – where your personal contact with experienced professional photographers makes all the difference. The staff at NYIP will help you meet your goals and master digital photography!
This page contains four installments:
At NYIP we value everyone's input. This email address is being protected from spambots. You need JavaScript enabled to view it. to send us your comments, feedback, or suggestions.
Tip for Beginning Photographers: Take Control of Your Flash
It's time to take control of your camera's flash. As wonderful as modern camera technology is, your camera is programmed to make certain assumptions.
Here are three basic assumptions that are programmed into your camera:
- If the exposure sensors determine that there's low illumination in the scene at which the camera is pointed, the flash will fire. Your camera has been programmed with the assumption that light from your camera's flash will improve your subject.
- If the exposure sensors determine that the scene has bright illumination, the flash won't fire. Camera programming assumes that the flash isn't necessary.
- In low light, the flash will fire regardless of the distance from the camera to the subject. After all, it's dark out there.
These performance characteristics make sense, and the programmers that design camera systems have made them work very effectively. The problem is that there are many common photographic situations when you want just the opposite results. Let's look at some specific examples.
Low Light
There are times when you want to take a photograph in low illumination without the flash because of the nature of your subject matter.


When the subject includes candles on a birthday cake, or perhaps lights on a Christmas tree, the result of turning off your flash is a photo that will be taken with a slower shutter speed and no flash. With the flash off, you have to make sure to hold the camera steady to keep your subject sharp. You'll probably get the best results if you use a tripod to steady the camera. If tungsten light bulbs (or candles) provide the illumination in the scene, the color of the image will probably be a warm orange/red tone.
Why go to the effort of using a tripod and getting warm colors? Because those characteristics may be more in keeping with the subject you're photographing and the way you want the image to look. Remember that the direct hard light that comes from the camera's flash gives a very cold, clinical look to the subject. That may be fine in certain circumstances, but not in others. You should make the choice, not your camera.
Bright Light


When you're working in bright sunlight, the camera's flash won't fire. That saves power for your batteries, but what if it takes away from your picture? That's not what you want. This is very common when your subject is a person and the sun is overhead in the sky. If the subject is wearing a hat, then you're likely to discover that your subject's entire face will be in dark shadow. Even without a hat, it's common to see heavy shadows under the chin and perhaps even obscuring your subject's eyes. The solution is to fill in those pesky shadows using a technique called fill flash.
Once again, the choice whether or not to use flash should be yours, not the camera's decision.
Scenic Photos in Low Light
Consider this: When tourists visit New York City and take pictures from the top of the Empire State Building at twilight or early evening - as they point their cameras toward the dramatic skyline scenes visible in all directions, their cameras' flashes fire, doing nothing to illuminate the canyons below. At best, the flash may light up a passing insect.
In each of these instances, the camera and flash have made the wrong assumption.
The solution to each of the situations we've described is to take control of your camera.
Today's automatic cameras - digital and film models - usually offer five basic camera settings.
Automatic
- Flash will fire when the exposure sensor and camera programming tell it to.Automatic with Red Eye
- Flash will fire when the exposure sensor tells it to, and the flash will employ some type of red eye reduction pre-lighting.If you pay no attention to your flash, when you turn on your camera it will automatically select one of these two settings, usually Automatic with red eye reduction. We suggest that you avoid using these two settings. Why? First, because you should decide when the flash fires and when it doesn't. Second, because the little pre-flashes of light that are supposed to reduce red eye don't do a very good job and often confuse your subjects.
Instead, we recommend you choose from the following flash options, depending on your subject and what you want to do with it.
Flash must fire
- This is the setting you can use to make sure your flash fires to fill in shadowed areas on sunny days. When you select this setting the flash will fire every time you press the shutter.
This photo is a perfect example of a picture that automatic flash wouldn't capture. Since we're looking up at the subject, there's lots of bright sky in the frame. If the photographer doesn't command the flash to fire, the girl's face would be lost in deep shadow.
Flash disabled
, so it won't fire. This setting is the one to use when you want to record your subject as illuminated by the available light in a low light setting.Remember, if you're taking pictures in low light without flash, you may need to steady your camera on a tripod to avoid blurring the photo because of camera shake.
Slow shutter with flash.
This is the least understood flash setting. The flash will fire (often with red eye reduction) but the shutter will stay open for a longer interval than necessary. This allows you to capture the subject that is illuminated by the flash, but also allows more time for other lighting in the scene to record itself on film. This setting is intended principally for pictures of people in front of brightly lit cityscapes - the flash provides the light to illuminate the people who are your principal subjects - let's say tourists in New York's Times Square or in front of a gaudy Las Vegas casino - and the additional interval that the shutter stays open allows time for the lights to get recorded by the film or chip in your camera.How to Set Your Camera's Flash
You have to find out exactly how to switch between these five settings yourself. Consult your camera's instruction book. The location of the lighting controls will vary considerably on film cameras, and with the wide variety of digital designs on the market, there are many different menu pathways used by different manufacturers. However, if your camera is an automatic model with a built-in flash, you'll find these five different settings somewhere in your camera's controls. Now you know which ones we recommend you use, and why you avoid automatic settings in most instances.
Tip for Advanced Photographers: Testing Your Camera's Time Delay
An inherent problem with many consumer-level digital cameras is time delay. Time delay is a combination of two factors, shutter lag and recycling time. Shutter lag is that annoying moment between the time you press the shutter and the actual point of exposure. Recycling time refers to the time necessary for the camera to process the digital information, store it, and get ready for the next shot. If you have ever used a point-and-shoot film camera, you've probably experienced shutter lag.
Because most affordable consumer level digital cameras are point-and-shoot models, they exhibit these tendencies too. Digital cameras must be able to process pixel information and that magnifies the problem. All is not lost however, if you learn to compensate for this digital "speed bump".
In order to compensate for the delay, two things must be accomplished:
- You must learn to anticipate action, so you can capture it with your camera.
- You must determine how your digital camera handles time delay.
Anticipating action can only come through experience. For example, if you are a sports photographer covering a baseball game, you'll want to be able to gauge when to click the shutter to capture the moment that the bat hits the ball. No small task when the pitch is a fastball traveling at 90 mph. Professional sports photographers will not only anticipate where to point their camera in order to best capture the action, but will also know the perfect moment to push the shutter button. They know this through experience with both their subject matter and their equipment. Photographic success and failure will help teach you when to make these critical exposures. Be conscious of your actions and you'll be able to repeat them.
The second issue relates directly to your equipment. Because every digital camera handles image capture a little differently it's a good idea to test your camera and see how it deals with time delay. Start by checking the recycle time on your camera. One way to do this is to photograph a clock with a sweep-second hand. Put your digital camera on a tripod, compose your image with the clock centered, filling the frame. It's a good idea to turn the flash off since reflections in the clock face might prevent you from reading it. Press the shutter halfway down to set exposure and focus, and then when the second hand hits 12, start shooting. Keep shooting as fast as the camera will allow. About seven or eight exposures will give you a pretty good idea of the delay between exposures. Now you can calculate your recycle time by listing the position of the second hand in each frame. The difference between any two consecutive frames represents the time your camera needs to recycle.
The second part of this exercise is to determine your camera's shutter lag delay. You can do this with the same clock, but this time you'll want to press the shutter fully at the point the sweep second hand hits noon. For this test, DO NOT press the shutter halfway down first, press it all the way down. This forces the camera to focus and determine exposure as quickly as the camera can. This scenario will simulate how your camera will react in a "grab shot" situation. Produce a series of exposures, each time as the second hand reaches 12. Be as consistent as possible. Of course, the frailties of the human brain are revealed here because the accuracy of the test is only as accurate as the photographer's eye-hand coordination. Your results may not be exactly the same each time. By producing a number of images you can compensate for these errors by averaging them. Averaging is accomplished by adding the test results together and dividing the total by the amount of exposures.
You don't need to know the exact amount of shutter lag delay that your camera has. After all, you won't be taking pictures with a stopwatch. However by getting a sense of your camera's shutter lag you can learn to compensate for it and capture the moment when you want, not when the camera does.
Digital Advisor Jim Barthman performed this test with a popular digital point-and-shoot and discovered a few things. For the recycle time test you can't continuously hold down the shutter; with this camera you must press the shutter fully, release it and do it again. Jim's recycle time tests showed that it took approximately three seconds between each exposure before the camera could capture the next shot. That time can be excruciating when you're trying to photograph a short-lived moment.
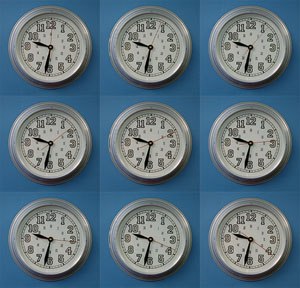
This test of recycle time shows an average of 3 seconds recycling between exposures.
The shutter lag test showed an approximate 1 1/2 second delay for a spontaneous shot. That means that with this camera you'd want to click the shutter 1 1/2 seconds before the intended capture. Again, this sort of anticipation is not easy and in some instances may be impossible. If your intentions are to capture only spontaneous moments, then this particular camera may not be the best choice.

A test of this camera shows a consistent 1 1/2 second shutter lag.
Because of the instant feedback, a digital camera is perfect for this type of testing. The testing costs nothing but time and the resulting information will be very helpful the next time you want to capture action.
Give these tests a try. Once you know how much to allow for time delay, you'll be well on your way to capturing more timely exposures with your digital camera.
Digital Camera Buying Guide: What Features Do You Need?
At NYIP, we've been tracking digital cameras since they first arrived on the scene in the mid 1990s. A lot has changed in the past ten years. The most important change is that digital cameras used to be complicated, expensive tools of limited value. Today, they're easy to use, much less costly, and for many purposes, the right tool for the job.
We don't conduct detailed reviews of individual cameras. Given the endless number of manufacturers and models, that's a job for specialists such as DP Review and other digital camera review sites. However, advertisers tend to flood potential consumers with all kinds of specs. Whether you're about to buy your first digital camera, or you're looking to upgrade your current holdings, here's our opinion of the specs and features that matter.
Megapixels:
At this point, we recommend purchasing a camera that is capable of capturing images of three million pixels (that's three megapixels) or more. There are lots of situations when you'll want to capture smaller files, but if you want to print a good 8"x10" image you'll need a minimum of three megapixels. Four megapixels might be even better if you find a camera that's in your price range.Zoom:
An optical zoom is a great feature. We see no benefit to digital zoom ("DZ") whatsoever. DZ is just stretching a portion of an image captured by the camera's glass (or optical) lens. So, if you're looking at one camera that has a 3x optical zoom and another that only has a 2x optical zoom but boasts a 20x digital zoom, we prefer the 3x optical zoom model.Batteries:
Digital cameras use lots of power. Many models are still powered by 2 to 4 AA batteries, but we like the newer models that have a rechargeable lithium ion battery built in. You just pop the camera in its charger overnight and you're set to go in a few hours. It's like charging your cell phone. If you shoot a lot, look for a model that allows you to charge a second battery in the charger while you're using your camera.If you do buy a camera that takes AA batteries, we think rechargeable batteries and a charger are an excellent investment. Those AA batteries are expensive. Either way, bear in mind that you'll save a lot of money if you don't use the LCD viewfinder all the time -it draws a lot of power from your batteries.
Consider an AC Adapter:
We think it's an outrage that so many digital cameras are sold without an AC Adapter. This is a very handy item, and particularly if you're doing studio stuff - say taking pictures of items for an online auction - you'll find using an AC Adapter gets you out of the battery game altogether and allows you to use your LCD viewfinder to your heart's content. Unfortunately, name brand AC Adapters made by the camera's manufacturer tend to be very expensive. You'll be OK purchasing an adapter made to fit your camera's make and model from an aftermarket supplier such as Digipower.LCD Viewfinder:
We expect to start to see a new generation of LCD viewfinders that will be made using what are known as OLEDs, that is Organic Light Emitting Diodes. Kodak announced they would bring a model to market last March, but we haven't seen it turn up yet. The working prototypes that we observed were great. The OLED image is much brighter, which means it will be better to use in daylight/sunlight, and you could see the image from a wider angle than with traditional LED screens. Once OLEDs hit the market, we expect they will be a big hit with consumers.Digital SLR/ZLR Viewfinders:
SLR stands for Single Lens Reflex, which simply means that you view the scene through the lens that takes the picture rather than a separate viewfinder window, which can often show a composition that differs from what the camera actually sees, particularly when you're working at close distances. Another benefit of most SLR cameras - either film or digital models - is that you can mount a variety of different lenses on the camera body. The term "ZLR" was coined to describe Zoom Lens Reflexes, where you see the image viewed by the camera's lens, but there is a zoom lens permanently affixed to the camera and you can't change to a different lens.In order to cut costs, some digital ZLRs show you the scene in front of you not through a true optical reflex viewing system but instead place a tiny LCD viewfinder in the eyepiece. We find some of these systems difficult to focus. If you're in the market for a ZLR digital camera, try testing a model at the store with an LCD viewer before you purchase one. Some people like them, others don't. You be the judge.
Memory Cards:
In the last century there were two formats that split the market - Compact Flash and SmartMedia. Now they have been joined by Secure Digital, Memory Stick, xD Picture Card and others. Most cameras accept just one format and are not compatible with the others. Image quality that is recorded is acceptable with all formats - the key issues are speed of recording and memory capacity size.Speed:
Some of the key manufacturers in the field are offering new models of cards with higher speeds. Naturally, these cost more. Depending on what type of subject matter you like to photograph, these faster cards may be worth your while.Card Size:
Here we favor large size cards, say 64MB and 128MB size, but we don't recommend you buy a giant card - say 1 Gigabyte. There are two reasons for this suggestion. First, the giant cards are expensive, and second, since all cards are tiny, somewhat fragile, and most don't like water, they're delicate. As the saying goes, don't put all your eggs in one basket. We know one photographer who recorded all the photos from a 10-day trip to Costa Rica on one card and then dropped it into a glass of water by accident. Play it safe -- use a few different cards.Remember that once you buy a camera and purchase a few cards, if you switch to a different camera make and model your existing memory cards may not work with your new camera..
Card Reader:
Many photographers use a memory card reader that allows you to take a card full of images, pop it into the reader and then rapidly download the images into your computer through a USB or USB 2 connection. This is often an easier and faster way to get images into the computer than downloading from your camera.
Zip Drive or CD-ROM Burner:
The biggest mistake beginners make in digital photography is thinking that once they've downloaded their images into their computer they can erase the memory card and enjoy their photos for ever after. We wish this were the case but it's not. Hard drives crash, homes get flooded, all kinds of other awful things can happen too. Your photos aren't safe until they're backed up onto some kind of safe media that you can store in a separate location. While it takes a little longer to burn a CD-ROM as opposed to a Zip Disk, CDs are cheaper and more durable. But how you back up is less important than backing up. Don't do it and you'll come to regret it. We promise.
Computer Operating Systems:
We know you're not shopping for a computer right now - you're thinking of buying a digital camera. But you should be aware of the fact that the most recent computer operating systems - Windows XP and Macintosh OSX - are extremely photo friendly. XP, for example, recognizes most new models of digital cameras and can download photos using its own software, which saves you the time and effort of downloading the software that comes with your camera. If you're not adept at installing software and making your computer do what you want, this kind of photo-friendliness can be a real plus. In addition, if you're still grinding along with Windows 95 or 98, you're going to run into trouble down the road and it's probably time to think about an upgrade.
Digital vs. Film:
As any serious photographer will tell you, film is still a great way to make photographs. Digital photography may be cheaper for you, depending what you want to do, but the effective "speed" of digital cameras is slow. If you like low tech, and if you like taking photos in dim illumination, film could still be the better choice for you. Not long ago, a major company spent a lot of money to study households that owned both a film and a digital camera to find out when consumers chose to use the film model. The overwhelming answer was that they turned to film when the subject was more important. They actually trusted film more. Recently we've heard a new term - digital honeymoon - that connotes people who switch to a digital camera but then come back to film. But it's really just a matter of getting used to the pros and cons of digital over film.
Professionals know that a digital camera is just a different type of tool than a film camera. The trick is to select the right tool for the job. If speed is an issue, digital wins. If privacy is an issue, score one for digital - who wants the guy at the one-hour lab looking at intimate pictures of a loved one? If you only need one picture to post on a Web site, why waste a roll of film and wait for processing? Digital cameras are great tools, and the new ones are easier than ever to use.
In conclusion:
Many amateur photographers buy a digital camera because they think that anything digital will automatically mean that their pictures will be better and that photography will be easier. This is not the case. We see lots of people making the same basic photography mistakes with digital cameras that used to be made using film. There's still no substitute for learning how to take great pictures.
What is the Digital Revolution?
While the camera manufacturers extol the virtues of the digital camera, the digital revolution in photography is much more sweeping than that. These are the most exciting times in photography since George Eastman introduced the first Kodak cameras. Photography, in the hands of thousands of passionate amateurs and a few professionals, began to change the world. Today, that change continues.
For professionals, the heart of the digital revolution is the electronic darkroom and digital output even more than in the use of digital cameras.
Many professionals still use film to record their photographs. They then create high-resolution scans from their slides and negatives, converting the photographs into digital form. Professionals know that many of the greatest benefits of digital photography stem from being able to quickly correct, enhance, and manipulate a photograph using image-editing software in the computer - usually called the "digital darkroom" or the "electronic darkroom." In the computer environment, it's possible to make dramatic changes to a photograph in minutes that would have taken hours, even days, in the traditional wet darkroom.
The Digital Darkroom.
Adobe Photoshop overwhelmingly dominates the professional image-editing software category. While there are many other image-editing software programs on the market, Photoshop has been the dominant one for nearly twenty years because photographers, graphic artists, and printers use it. Other programs, including Adobe's Photoshop Elements, don't have the features those professionals in these different industries demand. At NYIP, we often speak with photographers who have Photoshop "sitting on their desktop." They purchased this complicated program, but they haven't really figured out how to use it. We created our Complete Course in Digital Photography - which includes twenty lessons in Photoshop - to help photographers learn how to use Adobe Photoshop.
Scanning.
Professional photographers need to obtain high-quality, high-resolution scans from their images. They're not likely to use a flatbed scanner to scan prints, since those prints are a second-generation image made from a negative. Professionals more commonly use a film scanner to scan the original slide or negative, or take their image to a service bureau for a high-resolution drum scan. Another option is to have Kodak Photo-CD scans made from their images. Photo-CD is an entirely different product from Picture-CD, a low/medium scan that the photo industry supplies to consumers and family photographers. Both are supplied on CDs, but Photo-CD provides multiple scans of each image ranging from thumbnail-size to extremely high-resolution scans.
Sometimes, it is necessary to make a scan from a print. Perhaps you're working with historic photographs or other prints for which there is no available negative. It is possible to produce high-quality scans using a flatbed scanner, but that requires training. NYIP's Complete Course in Digital Photography provides complete training in the use of a flatbed scanner, how to scan through Photoshop, and when and how you go about getting scans made from slides and negatives.
Digital Output.
- A breaking news photograph is flashed around the world just minutes after a photojournalist captures it.
- Proud parents e-mail pictures of a newborn baby to grandparents, friends, and relatives and also order a set of mugs with the baby's picture, all with a few key strokes.
- A medical specialist analyzes the latest X-ray of a critically ill child in a hospital ten thousand miles away.
- Six-story billboards and complete bus wraps promote promote the latest fashion campaign from the hottest designer of the moment.
- Only hours after you find a great deal at the flea market, you post the item for sale at the big online auction site.
These are all examples of the revolution in digital photo output. It has affected our entire society - the way news is transmitted, the way families interact, the fields of medicine and science, advertising and commerce. Digital output options have changed the rules of the game - every game.
In the world of photography, the change has been sweeping. Photographers who used to make black-and-white or color prints of their pictures in the traditional "wet" darkroom now use inkjet or dye sublimation printers.
At NYIP we judge a large national photo contest that offers tens of thousands of dollars of prize money. We look at thousands and thousands of prints submitted by amateurs from all around the world. Nowadays, about 50% of the prints we see are made on inkjet printers. The amazing thing is how bad many of the prints are. How many potentially winning images are disfigured by banding, bad ink sets, poor color management, and all kinds of other printing mistakes.
In NYIP's Complete Course in Digital Photography we teach our students the fundamentals of all types of digital output and provide extensive training in printmaking using photo-quality inkjet printers.
We don't think the digital revolution in photography has come to an end as yet. Despite the sweeping changes in the way images are captured, manipulated, transmitted, and printed, there's more to come. We anticipate new tools in the near future that will help photographers make images that we can't even imagine today and bring them to a bigger audience faster than ever. The power of photography continues to grow.


