

Versatility is an important virtue of a working photographer. Think Swiss Army knife; flexible enough to handle any situation. Sure, you can specialize in certain areas like nature, fashion, or weddings. Yet, the ability to step outside of your comfort zone and shoot a variety of jobs can be a productive way to further develop your skill set. This was certainly the case on a recent job I shot in uptown Manhattan. The objective was to highlight the work of a New York based Feng Shui designer. Here's how I handled it photographically.
It's All About the Light
I used my Canon 580EXII flash off camera on a light stand. While a sync cord could work, I find the whole process much easier as a wireless setup. To accomplish this, I used the Pocket Wizard Flex and Mini. This allowed me to move my light anywhere in the room and not have to worry if the wires would reach. In most cases, the flash was pointed straight up. I find this to provide fairly even light. Another major benefit of these particular Pocket Wizards is the ability to use TTL technology wirelessly. As such, I was able to set the flash to TTL, and simply adjust the output of light as needed. For some shots, I cut the flash output to -2 or -3, while other areas in the apartment required a bit more light.
My Gitzo Does Wood Floors
Indoors or out, a sturdy tripod is an absolute necessity if you want cactus-sharp photos. To create an atmosphere, or mood, you only want to turn on some of the light fixtures. As such, exposure times can be around 1/15 or slower. This is way too long to hand hold even with IS or VR lenses. A monopod would not work in this instance either.
I found an inexpensive and convenient way to carry the tripod and light stand together. Just throw them in a camping chair bag, and you are good to go. They even have a shoulder strap making for super easy transport.
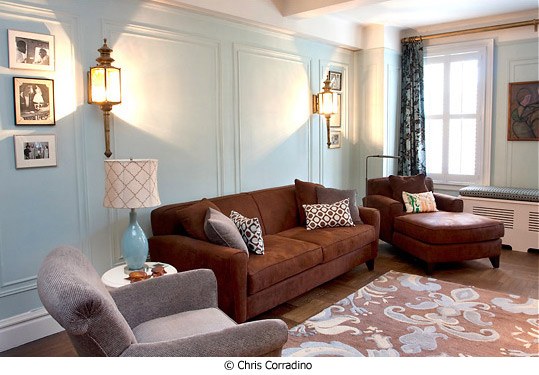
Photo above: Notice how the wall fixture is lit while the lamp is off. This directional lighting aided on creating an atmosphere in the photo. Then, to add more color to the scene, I turned on the hall light which was a regular Tungsten bulb. This shows as a warm yellow color, and constrasted nicely with the cool tones of the wall paint. Camera settings: 17mm, f8, 2.5 seconds, ISO 200, ETTL -2, tripod.
Sweat the Small Stuff
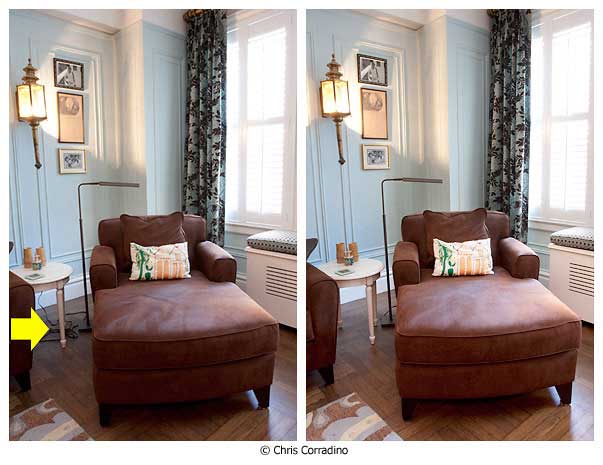
An electric wire here, a dust bunny there, and you have a sloppy photo. Be observant of the details and fix them before pressing the shutter. Sure, you could remove it in Photoshop, but that would require a substantial addition of retouching time. Is that something you're prepared to bill your client for? Getting it right in the camera is beneficial for everyone involved. In the example below, the arrow points to a distracting wire. After I noticed it, we made a very quick correction by simply hiding it behind the chair (no Photoshop necessary).
Camera and Lens
I shot the entire job with one lens, the Canon 17-40mm. It was mounted on a Canon 40D. I manually exposed every photo, used autofocus, and shot in RAW. To make sure I had sufficient depth of field, my aperture was always between f8 and f11.
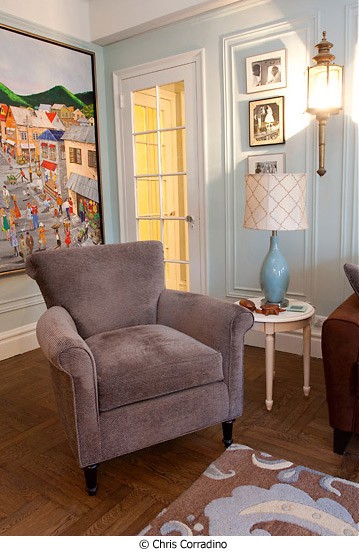
Pictured above: Having multiple sources of light with different color temperatures can be an effective way to add more depth to your interior photos. For this image, I just flipped on the hallway light to accentuate the painting on the wall. Camera settings: 17mm, f8, 1/4, ISO 200, Flash -1, tripod.
The next time someone asks you to do something different from your normal gig, consider giving it a try. You never know what the opportunity could lead to. If you're unsure of how you'll handle it, do the necessary research and planning. You'll end up being a better photographer for it.


