


If you’re looking for something different to try with your photography this weekend, consider attempting a refraction shot. Not to be confused with reflection photography, which is incredibly popular and pretty straightforward, refraction work is much less common, and will provide you with some distinctive results.
How does Refraction Work?
Essentially, refraction occurs when light passes through an object. In terms of photography, professionals tend to use glass lens balls when trying to create an intentional refraction for their work. So in this case, that object the light is passing through would be that aforementioned glass ball (but sometimes water or other types of glass can be used to achieve similar results).
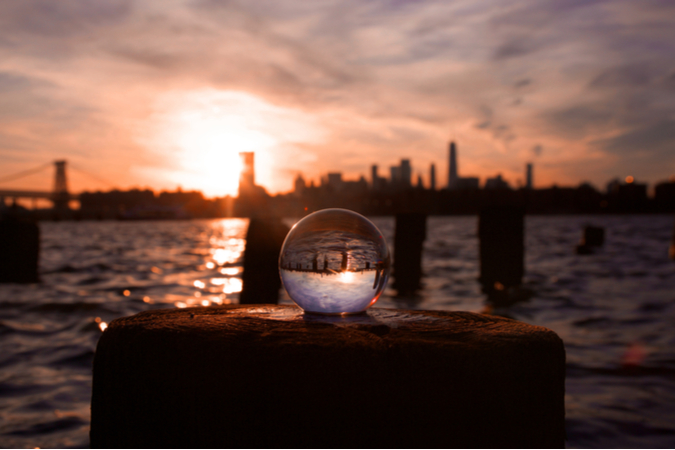
So if you picture this in practice, imagine pointing your camera at a city skyline to take a photo, but then holding up a round glass ball right in front of your camera’s lens. When this happens, the skyline image on the other side of your glass ball will consequently distort in the background. But if you focus properly, that skyline will appear, inverted but very clearly visible, within the middle of your glass ball (see image below).
How To Take a Refraction Photo
You’ll need to start by getting your glass ball level with the subject you’re trying to shoot.
When it comes to placement, if you position the glass slightly off-center, you’ll tend to get more distortion and less visual impact. In the image above, the artist went slightly right for some unique visual impact- but if you’re new to this and want to be on the safe side, centered subjects are easier to sharpen.
Depending on how large your subject is, you’ll need to get pretty close to it in order to avoid it looking far too small and indiscernible. If you’re photographing something large like an entire skyline, you have more flexibility. But if it’s something small like the tree you see below, you’ll need to get as close as possible while still keeping the entire subject within your frame.

What Gear and Settings Work Best for Refraction Photos?
When it comes to gear, work with a macro or telephoto lens (one with macro capabilities) if you have access to either. This will allow you to get your lens very close to the glass ball, which makes it much easier to keep things focused and sharp.
Once you’re set up and ready to shoot, try an aperture of f/4 to start- this is just large enough to gently blur the background while keeping the subject within the glass ball well-focused. Depending on the scene you’re photographing, you might need to toggle the f-stop to adjust, but f/4 is a great place to start.
Want More Photography Tutorials?
If you’re looking for more unique exercises like this one to switch up your photography routine, head to NYIP’s Photography Tutorials Blog for a full list of things to practice. If you sign up to receive the New York Institute of Photography newsletter, you’ll be emailed tips, tricks and projects to work on every month as a reminder to get out there and practice- plus exclusive discounts on NYIP’s Online Courses.


