

If you've always used your digital camera in automatic mode, then you know that sometimes you get great results, and other times, you get somewhat disappointing ones. This is because in automatic mode, a camera has to take into account many variables of light, shadow, and color balance, and then make the best decisions it can to compensate for all of them at once. In some settings, a little finesse is needed to get the best photograph — and cameras aren't always as good at finesse as human eyes are.
Learning all the details of your camera's manual settings can feel daunting at first, but once you start down this road, the improvement in your photography should get you excited about learning more. To learn the basic functions of your camera so you can begin to capture professional-grade images, check out our fundamentals of digital photography course. Here are three easy ways to venture into manual mode without too much technical learning. Speaking of "manual," grab your camera's printed manual and read about how these settings work on your particular model.
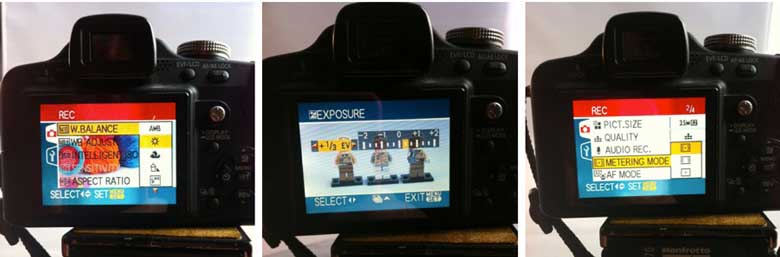
Adjusting White Balance
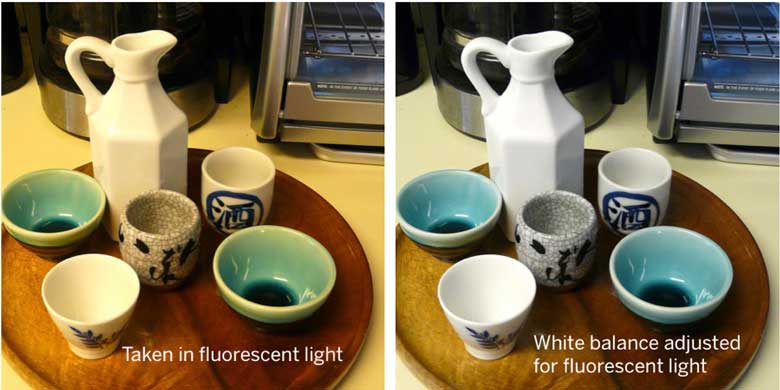
Different kinds of light have different color casts. Your eyes color-correct them all the time, but your camera can't always do that. If you shoot in fluorescent light, for example, the shots will often have a greenish cast. Shooting in incandescent light, you get a yellowish cast. Natural shadows often impart a blue tone.
Your camera can compensate for these colors if you adjust its white balance setting. White balance adjustments will correct the overall color tone so that the whites and colors in your photos are true to nature, not tinted by the light washing over them. White balance is an especially important setting when you're shooting in indoor light.
Many cameras come with presets for the most common types of light settings: bright sunlight, cloudy sunlight, shade, incandescent/halogen light, and flash. If you're not sure which setting will work best for you, try taking the same shot with each setting your camera has, and see which version has the truest colors.
Adjusting Exposure Value
Shooting with entirely manual exposure settings can get a bit technical, and works best when you take a little time to study the basics of ISO, aperture, and shutter speed. But we're just venturing into manual settings here, so let's play with a partially manual setting instead.
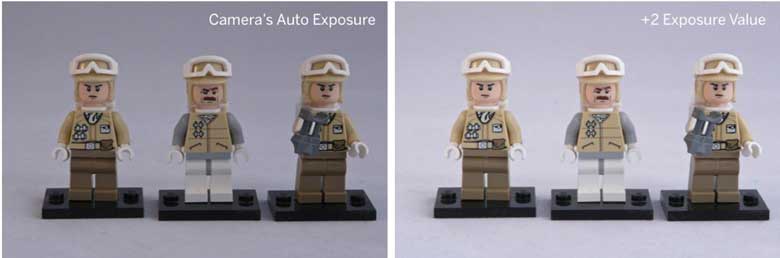
While your camera is in an automatic exposure mode, you should have access to an EV (Exposure Value) Compensation setting. This slider will adjust the exposure of your shot so it's slightly brighter or darker than the camera's automatic setting. Remember, as we discussed above, your camera makes the best automatic exposure decisions it can, taking many factors into account. EV adjustments help you compensate a bit when the automatic exposure just isn't giving you a great image.
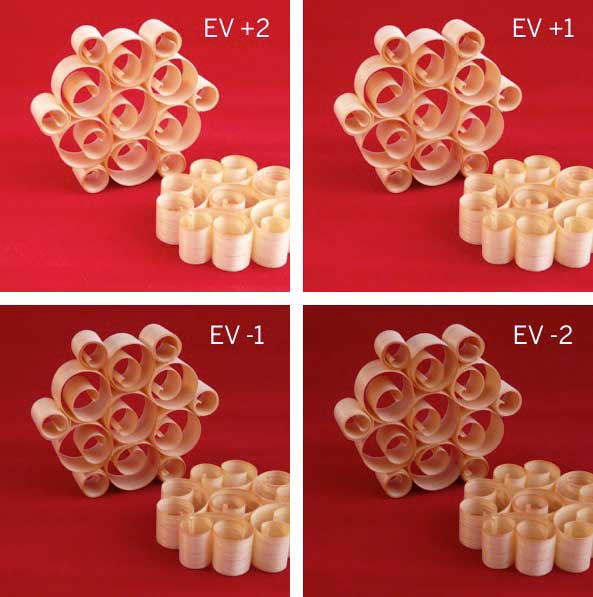
When you're shooting in low or indoor light, try setting the EV a step or two brighter to eliminate that overall grey cast. When you're outdoors in direct sunlight, try setting the EV a step or two darker to bring back colors and details. Try several shots at different EV settings and see which ones look best.
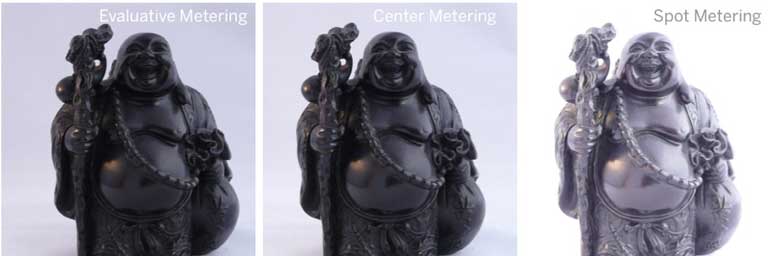
Adjusting Metering Mode
Metering mode is another partially manual adjustment. The metering mode you choose tells your camera how much information to take into account when it's making those automatic exposure decisions.
Most digital cameras have these metering modes:
- Evaluative (or Multi-Area): In this mode, your camera reads the light and dark areas in every part of the scene you're shooting and averages them out to arrive at an exposure setting. This mode is great for general-purpose photography, especially when you're outdoors and using fairly wide angles on your subject matter.
- Center-Weighted: In this mode, your camera only reads the lights and darks in the center of the frame. Try this mode when you're shooting a specific subject rather than an entire scene.
- Spot: In spot metering, you can point to a specific spot in your subject, and your camera will use only the information in that spot to create an exposure setting. This kind of metering comes in handy when you're shooting something very light on a dark background, or vice versa. It's also handy when you're photographing people in strong light or shade conditions.
Try the same shot in all three metering modes and compare how they look. Which one shows the most detail? Which one creates the best presentation of your subject?
See? These manual modes are so easy to use, and they make an enormous difference in your photography. Give yourself a little challenge to try one of these settings in your next photo shoot, and see what happens.


