Editor's Note:
Here's the first of a two-part feature on how to photograph babies and young children. In this article, we concentrate on babies and toddlers. In our second piece we discuss photographing slightly older children. If you apply what we cover in these two articles, we guarantee you'll take better pictures of your children (or your neighbor's) than ever before. That's a promise!
Babies are the Number One subject of photographs the world over! And why not. They're cute, they're cuddly, they're unselfconscious, they're unpredictable. Especially...when they're ours!
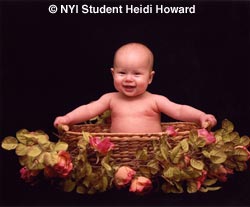
Truth is, we never cease to be amazed at how uncritical parents are of the prints they have of their kids. They love their Little Donny, so they love any picture of their Little Donny too. Unfortunately, lots of their pictures are downright lousy! And that's a pity because they could easily make Little Donny look even better if only they applied a little bit of common sense concerning what they can expect from a baby in different stages of infant development. And if only they would apply NYIP's Three Guidelines for Better Photographs.
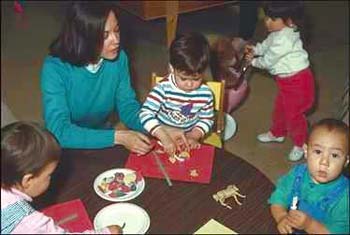
Here's a photo that probably was judged good enough to send to Aunt Tina to show her...who? Is it the little fellow with his head down working on his masterpiece, or him and his caretaker, or the party, or the kid at the lower right, or the toddler pushing a carriage in the background? The point is, we don't know. Maybe the proud parent behind the camera knew. Maybe Aunt Tina will figure it out. But the picture itself doesn't tell us — and that's a problem with all-too-many baby pictures.
What's the solution? Simple. Apply NYIP's Three Guidelines to Better Photographs to that picture of Little Donny.
Babies make this easy because NYIP's first Guideline - What's your subject? is already answered. Your subject is usually one of three things:
- Baby itself; or
- Baby with parents or with family or friends; or
- Baby discovering the world.
If you're the proud parent — or if you're photographing someone else's baby — it still comes down to these three things. NYIP Guideline One says you should know what you want to be the subject of your picture before you snap the shutter. Fine. You only have three choices. So make up your mind and make sure that you see your subject — loud and clear! — in the viewfinder before your finger presses the shutter-release button.
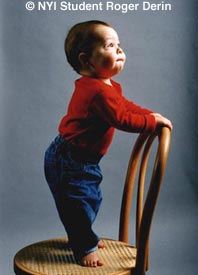
For example, what's the subject here? It's crystal clear that it's the boy who's (barely) standing up. How do we know he's the subject? Here we come to NYIP Guideline Two: Focus attention on the subject. That is, shoot the picture so that the viewer's eye is drawn to the subject. In this case our eye is drawn directly to the little fellow because he's big and fills the frame. He's sharply in focus. And he's well-lit. All of these things make him stand out as the clear and unambiguous subject.
And the subject stands out loud and clear because Roger Derin also applied NYIP Guideline Three: He simplified! That is, he allowed nothing extraneous to be seen in the picture that might distract the eye away from the subject. In this case Roger has achieved the ultimate in simplicity by using a seamless sheet of gray paper as the background.
Look at this picture and see how everything in it combines to draw attention to the toddler. That's the objective of the NYIP Three Guidelines for Better Pictures, and you should apply them to every picture of Junior (or anything else!) you take.
NOW, before we go any further...
NOTICE...WARNING...NOTICE:
Think safety first! Always employ complete and thought-out safety precautions before posing a child anywhere other than in some loving adult's competent arms. Never pose a child or use props that are in any way disrespectful of the innocence of children or put them at any sort of risk.
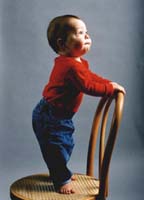
For example, in this picture we presume Mom is hovering just outside the photo's frame, steadying the legs of the chair and ready to grab Baby if he tumbles. Maybe Mom has Grandma spotting Baby from the other side. We hope so. Lately, we've heard several separate, heart-rending stories of kids who took tumbles while being photographed. Whether nothing happens, or "nothing serious" happens, there's always the danger that something serious might happen, so the child should not be put at risk in any photo session.
Now, back to photographs.
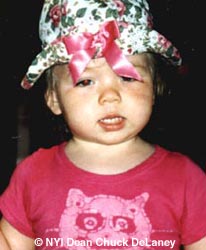
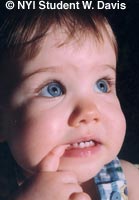
Let's turn our attention to the dreaded red-eye, such as that which we see in this picture. You probably have lots of pictures of your kids that are ruined by red-eye. What causes it? How can it be avoided?First, the causes. Red-eye results when bright light is reflected back onto the film from the blood-rich back of the eyeball - the retina. To see this in your image, you need three things: First, is a bright light source. The culprit in most of your pictures is the little flash on your camera. Second, you need the subject's pupils to be wide open so that the camera can "see" the retina. Third, you need an angle where the reflection of the light comes back directly into the lens.
Second, the solution. You can avoid red-eye if you eliminate any one of the three factors.
Factor One: If you don't use flash, you usually won't get red-eye.
Factor Two: Factor Two: If the pupils aren't wide open, you won't get red-eye. If you examine your ruined red-eye pictures closely, you'll probably find they were taken indoors. (That's probably why you used flash in the first place.) When your subject is indoors — especially, a baby — his or her pupils are usually wide open to compensate for the reduced light-level. (When the doctor shines a flashlight into your eyes, he wants to see the pupils close down. After a moment or two, they usually do.) But in the thousandth of a second or less in which a strobe flashes, the pupils don't have time to close down. So the light from the flash enters the eyeball and reflects off the retina before the pupils can close down. How can you avoid this if you use flash? Shoot only when the subject's pupils are already closed down. For example, when you shoot outdoors the light — even in open shade — is usually so bright that the pupils are already closed down. Or try using the "red-eye reduction" function on your camera. In most cameras today, this operates by firing the flash a few times before the picture is taken. The idea is that the pre-exposure flashes will cause the pupils to shut down before the actual picture is taken.

Factor Three Factor Three is that the angle of the light must be such that it reflects back into the lens. If the light source is just a few inches away from the lens, the light won't be reflected back into the lens and we won't see red-eye even if it's there. But many of today's cameras often have the flash built in right next to the lens. So the light goes out, into Baby's eyes, and is reflected right back into the lens and onto the image. We usually didn't have this problem with pictures taken in the "good old days" because the flash was a few inches away from the lens, so we didn't see this reflection in the image. Solution? If you must use flash, and if it isn't built into your camera right next to the lens, make sure it's at least four inches from the lens.
To sum up, you can eliminate red-eye in your baby pictures by any one of three approaches: Don't use flash. If you must use a flash, try to avoid dimly lit indoor situation or use your camera's built in red-eye reduction feature. If you can't avoid the first two, try to move the flash so that it's at least four inches from the lens.
Now, can you do anything to salvage an otherwise perfect print of Baby that is ruined only by red-eye? There's still hope. Most of today's digital imaging programs will allow you to fix the problem before you print the picture. Some of the software even has automated tools to correct the problem in a couple of keystrokes. If you've gotten a print back from the lab only to find that Baby has a red-eye, all may not be lost. Try using a red-eye touch up pen, which is sold for a few dollars in many photo shops. It's not perfect, but it's better than nothing. How does it work? In effect, it lets you darken the red spots into black spots.
Okay. You've avoided red-eye — or at least you're aware of the risk. Let's move on.
Good baby pictures occur only when the child is well-rested, comfortable, and secure. To this end, never try to take pictures when Baby is tired or cranky or wet. And don't forget that babies are most secure when a parent is around. Even if you're photographing the baby alone in the frame, things will go better if Mom or Dad is close at hand.
Also remember that, to a baby, that person behind the camera can look pretty scary. You're not going to get a good picture if Baby is afraid of you. So it's a good idea to put the camera down every now and then, and play with the child in some foolish way that will reassure Baby that you're not a monster.
All right. You've followed the three NYIP Guidelines. And you've avoided red-eye. And Baby feels comfortable and secure. What else will help you take better baby pictures?
Consider the stage of Baby's development. Don't expect babies — even yours! — to do things they're too young to do. For example, don't expect them to hold their heads up or stand up if they haven't reached that stage of development yet. When you photograph Baby, take his or her stage of development into consideration. From a photographic viewpoint, we can divide development into roughly four stages before Baby reaches the age of two.
First, from birth to three months, Baby is little more than a tiny object. Whether photography starts in the delivery room, as here, or shortly thereafter, you'll mostly have a tiny, swaddled, sleeping baby as your subject.
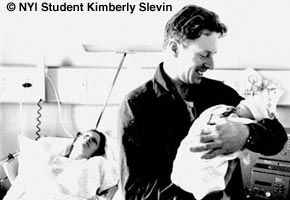
Here's an example of what we mentioned above as the second type of subject in Baby Pictures — namely, Baby with Parent. Certainly, this picture is more complex than the one of the kid on the chair. Here the subject is not the child or the parent — it's the relationship between the two. It's the look of love on the father's face as he beams down upon his newborn babe, and it's the look of exhausted satisfaction on Mom's face too. There's a lot going on here, but it all works toward the one goal of setting forth its subject.
This photo is interesting from another standpoint as well. While you'll see lots of pictures of Mom with Baby and of Dad with Baby, you'll see very few of both with Baby. Why? Because it requires someone else to take the picture. Yet it's so important to future memories. so, don't overlook drafting that third person into duty whenever the occasion arises.
In fact, at least once during Baby's first years, have a family portrait taken by a professional — or at least by Uncle Charlie if he's really a good photographer. There's something about everyone taking the time to look their best at the same special moment that's part of the magic of good professional portrait photography.
Still, most of your pictures of your Baby will be taken by you with your camera. One question we're frequently is this: Is there any risk to the eyes of young babies if I use flash when I shoot their pictures? Since the experts are divided on this point, we think you should err on the side of caution: Keep flash use to a minimum. If you do use flash for a few pictures, stay at a reasonable distance. Our advice: Don't ever use flash for closeups! And we've already discussed the problem flash causes with red-eye. So avoid it if you can.
Since little babies don't move quickly anyway, you should have little need for flash. Rather, use a higher ISO setting on your camera, 400 or 800 perhaps. If you use a point-and-shoot, the flash is often automatic. This means it goes off whenever the camera thinks it will help. Most point-and-shoots have an override setting that allows you to turn off the flash. If your camera has this feature, use it!
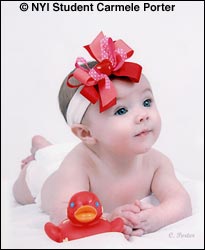
If you're shooting outdoors, should you place the child in direct sunlight to make sure there's enough light? No! Direct sunlight is bad for baby pictures (for that matter, it's bad for any people picture because your subject — in this case, Baby — is going to squint. And you don't want a picture of Squinty!
What type of outdoor light is best? What is called "open shade." This is an outdoor area that is shaded from the direct rays of the sun — for example, the shadowed light under a big tree, the shadowed light alongside a building, the shadowed light under a beach umbrella. In fact, the biggest "shadower" of all is a cloud. You get wonderful outdoor light for your baby picture on a cloudy day. So please don't put away your camera just because the sun is hiding behind an overcast. The lighting may be perfect!
The second stage of development (from the photographic viewpoint) is from about three months to nine months. Baby is starting to move. At this stage babies can locate their hands and feet, show interest in objects near them, and as weeks and months pass, start to roll over, sit up, and perform all sorts of simple antics that are a joy to photograph. They're aware of you and the camera, and while they won't perform for the camera, they also won't be self-conscious in front of the lens as happens when kids get older. That means you can get in close and photograph the child as he or she starts to reach out to the world around them.
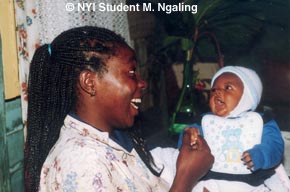
At this stage, you can get wonderful pictures of Baby with Mom or Dad or both. As we noted previously with the picture of Dad with his newborn, the key to successful pictures of parents and children (or any group, for that matter) is to show relationship. This can be done easily by having your subjects look at each other, or look in the same direction. It isn't necessary, and often doesn't work with little babies, to try to get both Mom and Baby to look directly into the camera. The easiest approach to natural looking photographs is to have Baby look at some prop you hold that makes noise. It may be a squeaky toy or just a bag with coins or other small objects (we prefer a small bag of beans) that can become a "shaky" — that is, a little noisemaker. You shake it...and the child looks up with riveted attention. Direct the parent to look at the same object, or to look at the child. Either way works.
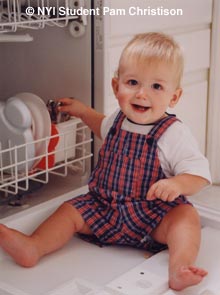
The third stage of development is from nine months to around fifteen months. Baby is now on the move...or, at least, on the crawl. Some start earlier than others, but somewhere in this period you'll encounter crawling, then using a walker, then Baby's first steps, and finally toddling about with ever-greater breakneck speed.
At this stage we suggest you get down low to get a child's-eye view of the world - and to make the child look large in the world he or she inhabits. At this stage you may have to work fast to keep up with Baby, but never forget the three NYIP Guidelines as you concentrate on recording the new accomplishments that mark this stage of development.
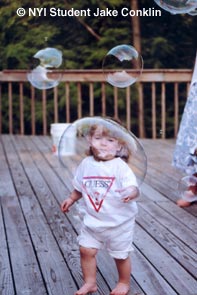
Finally, the fourth stage of development is from about fifteen months to twenty-four months. Now Baby is on the go. Discovery of the physical world is no longer subject to mobility limitations, and Baby wants to go everywhere and investigate everything. Our advice at this stage is to just keep your camera ready for anything, and shoot a lot of never-to-be-repeated moments. Once again, we can only advise you to always follow the three NYIP Guidelines for Better Pictures. They will assure your success.
So, NYIP's formula for Great Baby Photos is simple. 1) Follow the Three Guidelines; 2) When outdoors, shoot in open shade, not direct sunlight; 3) When indoors, try to avoid using strobe and if you use strobe try to avoid red-eye; 4) Indoors or out, make sure Baby feels rested, dry, and secure; and 5) At all ages be aware of Baby's stage of development and plan your shots accordingly. And, of course, under all circumstances make sure Baby is safe!


