

In Part 1 of this series, we talked about NYIP mentor Ted Fisher’s ABC Nightline Photoshop tutorial and the many ways in which family photographers especially are growing to greatly benefit from post-production tools.
Oops, No Flash!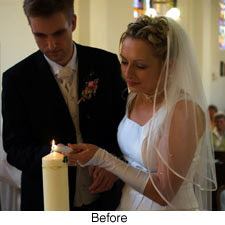
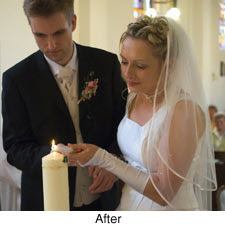
Photo albums are often littered with pictures that are too dark because the photographer didn't turn on their flash. In this picture, the photographer should have used fill flash to illuminate the bride and groom's faces. All is not lost however. In fact, it's a pretty simple fix most of the time. In Adobe Photoshop, choose Layer > New Adjustment Layer > Levels. A histogram will open up. Slide the white triangle on the right until it lines up with the first peak on the right side of the histogram. Slide the black triangle on the left until it lines up with the first peak on the left side of the histogram. Then, you can move the middle triangle to the left until you get a pleasing amount of brightness in the photograph. Do not go too far or you'll start to see artifacts and other damage to the pixels in the picture.
Fun With Color.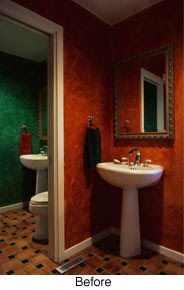
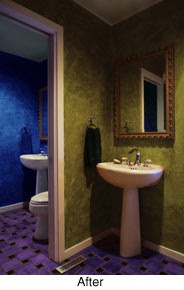
Sometimes, there's not a problem with the photograph, it just isn't the picture you want to see. For example, let's look at this picture of a red and green bathroom. Quite festive, but what if you wanted to see what the room would look like painted in a different set of colors. You could go out and buy a couple of cans of paint and then spend the better part of a day or two repainting the bathroom for optimal family photos. Or, you could adjust the photograph to see if you like the color choice. First, choose Select > Color Range. Then, choose a color range from the pull down menu, or use the "eye dropper" to click on a color. In this example, we choose to adjust the red tones. Then, slide the Fuzziness arrow until the selection seems to cover the area you'd like to change. To complete the change, choose Image > Adjustments > Hue / Saturation and change the Hue to experiment with the look of the room. If you have an image with walls that don't select easily using the "Color Range" technique, try using the Magnetic Lasso Tool to select them.
Spots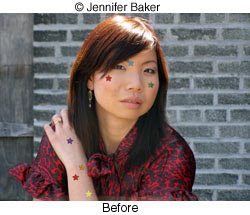
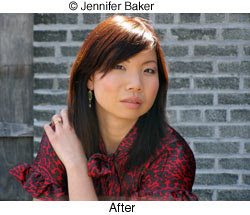
Ok, we all know that Aunt Sally is not very photogenic. Unfortunately, Aunt Sally doesn't know this. So, why disappoint her with a realistic photograph when you can show a picture that's better than the original? For example, let's take a look at this picture of Jeanne. Now, Jeanne doesn't have any blemishes so we're going to have to pretend that those stars plastered all over her face are actually age spots like Aunt Sally has (don't tell her!). To solve Jeanne's skin problem we're going to use Photoshop's Healing Brush. Simply select the tool and then choose a brush size close to the size of the star (or spot) that you want to fix. Hold down the Alt or Command Key and click on a clear spot with no blemishes right near the spot you want to fix. Then, simply click on the blemish. It should disappear right before your eyes after clicking on it a time or two. You can also use the Clone Stamp tool in a similar manner too.
Be Gone!
Got a boyfriend you want to make disappear? Or remove the light pole sticking out of someone's head,(it wasn't there when you took the picture, you swear!)? Using most of the techniques we just showed you, it's easy to erase unwanted portions of many photographs. In this example, we've removed a whole person from the photograph by using a combination of techniques. First, we used the Selection tool to choose a large swath of trees from the upper left portion of the photograph. Then, we copied and pasted the selection directly over the man. We used the Erase tool to clean it up a bit. And, we used the Clone Stamp tool and the Healing Brush to put in the necessary details to make the picture look realistic. No one ever has to know.
Red-Eye Correction.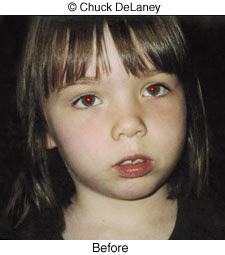

This happens to all of us at some point, even professional photographers. You've just taken what you thought were some great family photos of your daughter, but when you open up the image files on your computer, her beautiful blue eyes glow a frightening red. Red-eye (or green-eye in pets) happens for a variety of reasons. Those tiny on-camera flash units are usually the culprit, as they reflect light directly into your subject's retina, which photographs red. Many of today's point-and-shoot cameras offer a red-eye reduction feature which fires the flash off twice. The first flash is designed to make your subject's pupils to contract, so that the retina is not as visible when you actually take the photograph. However, red-eye reduction doesn't always work, especially if you forget to turn it on. So, what can you do?
Many of the basic digital imaging programs like Adobe Photoshop Elements or even the software that came with your camera, have automatic red-eye tools that easily let you correct the problem with just a few clicks of the mouse. Red-eye correction with the full version of Adobe Photoshop is a bit more complicated. First, use Photoshop's Magic Wand to select most of the red portion of your subject's eye. Then make the person's pupil darker (Image > Adjust > Brightness/Contrast). This probably won't change the glowing white catch light, so if that still has red in it, make a selection around that highlight (the Magnetic Lasso Tool would work for this) and use Image > Adjust > Desaturate to remove the red completely. You can even change the color of your subject's eyes, by playing around with the options in the Image > Adjust > Variations menu. The result should look quite normal – your daughter will no longer look possessed.
Using these techniques, everyone can now have a photo album full of family photos they'll be proud to show!


