

When the dark dreary days of winter descend upon us, many people put their cameras away — at least those who live in northern latitudes. But winter offers some opportunities for great images as long as certain precautions are taken, such as dressing warm, having a spare battery or two inside your clothes, and watching out for condensation when bringing that cold camera and lens indoors. However, sometimes it's not just the equipment that's cold. So are the images. I am referring to the cool color cast that snow pictures can exhibit. There are two culprits at work here. One, underexposure, is common unless the photographer deliberately "overexposes" above the meter reading. Why? Because camera meters are calibrated to render everything as a middle tone. It's not usually a problem with an image that has a wide range of tonal values. But snow scenes are not middle tones, especially if the snow takes up most of the image. Adjusting the exposure upward is the time-honored way to compensate for this shortcoming in meters.
Ok, this is fairly well known, at least amongst people who have some experience. Making this adjustment will at least get you pretty close, exposure-wise. But what about the color? That's a separate issue and there are probably as many ways to get "correct" color as there are people to do it. Note I said "correct" color with that word emphasized with quotation marks. Color perception is somewhat subjective so I prefer to use the term acceptable color. Which is to say, acceptable to the photographer and anyone for whom the image is intended.
What about snow? Why is snow blue (or gray)? Well, on overcast winter days, that gray look, especially in the shadows, is simply a reflection of the light while on clear blue-sky days, everything tends to have a blue color cast. That's the other culprit. In landscape photos, that color cast is a natural result of the light and if the exposure is correct, it's usually ok. Sometimes it's just a matter of warming it up a bit. In the days when we shot film, especially slides, the solution was to use a warming filter. Today, with digital tools, we handle it a bit differently.
Fine, enough "theory". Let's get to the specifics. There are two main approaches to good exposure and acceptable color. One, set the camera so that the resulting image gives us the result we want, taking care of the exposure and white balance with the tools the camera provides. This might mean bracketing the exposures (and/or using exposure compensation) and using the white balance presets the camera offers. In better DSLRs, these can often be tweaked further. Or you might decide to set a custom white balance. The other involves adjusting things in post-capture software, like Adobe Photoshop.
My workflow involves a combination of these two approaches. But before I get into that, I want to point out that photography is a personal endeavor and my way of doing things is certainly not the only one. Or even necessarily the best way. I simply offer this as an example.
First, I shoot RAW exclusively. There's nothing wrong with JPEG capture and in fact it's probably the preferred format for many photojournalists. RAW just happens to fit in with my overall approach to photography and is consistent with the subjects I shoot — scenics, usually with people, and portraits.
From this point on I will be discussing this in the context of Photoshop, specifically CS4, the version I currently use. But there are other image editors.
For snow-type images, I first set Exposure Compensation in the camera to about +1.5EV or so. The exact value depends on the light conditions and how much of the image actually consists of snow. This is a personal judgement thing; there are no hard-and-fast rules. I almost never bracket my shots since this procedure usually gets me pretty close to where I want to be, exposure-wise. Once I open the image in ACR (the Adobe RAW converter), I then adjust the White Balance if necessary, following by remaining adjustments to the other settings. These all depend on the particular image and how my camera renders the subject.
I like to do as much as I can in ACR before opening the image in Photoshop proper. But even in the latter, I try to keep the image at 16 bit until I'm ready to save it. Rarely do I have to do any exposure adjustments once the image is opened in Photoshop. But the color may require some minor tweaking, especially with snow scenes.
Ok, the next may cause real Photoshop experts (which I am NOT) some discomfort. There are probably better ways to deal with color but my defense is that this approach works for me. So here I set the White Point, usually using Levels. Finding the White Point in a snow scene is pretty simple, at least with fresh snow. Dirty and/or soiled snow may not be so white but I don't generally do snow shots in those conditions.
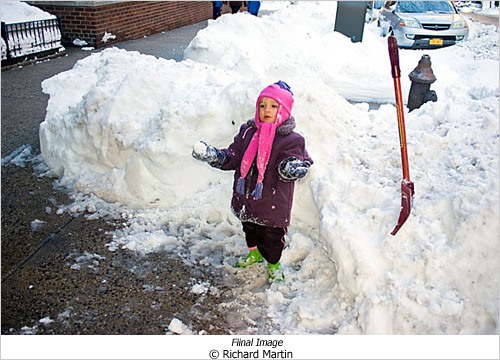
Here's a typical snow image, with my favorite "model", my granddaughter. Finding the whitest point can be accomplished by opening Levels, then while holding down the Alt (Option key on a MAC), move the highlight slider to the left until the whitest point is revealed. However, with a snow scene like this I simply "eyeball" it, then click on that spot with the white point eyedropper tool in the Levels Panel. Sometimes I have to play around with this a bit until I get the color I like. Less often, I might also set the Black Point and the Gray Point but usually not.
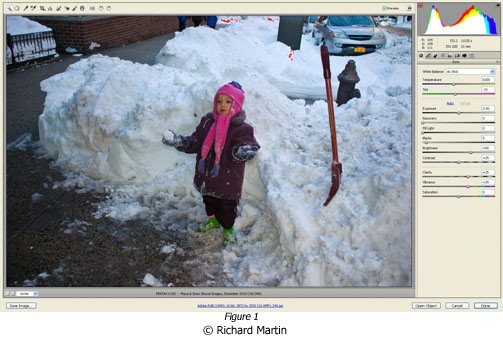
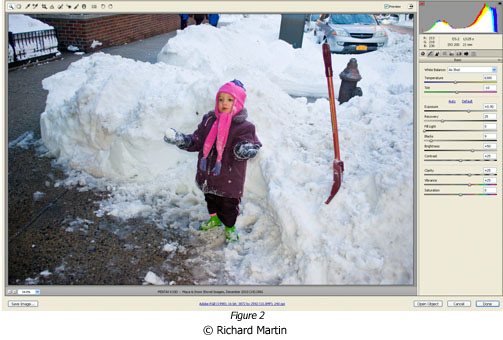
Figure 1 shows the image in ACR as the camera captured it. Even with Exposure Compensation set in the camera, the photo looks underexposed. Figure 2 shows the image after corrections in ACR. Much better but still not quite there. Figure 3 is the final version after white point adjustment, a little saturation increase (10%) to make the colors pop a bit more, and finally, sharpening.
One other point. Outdoor photos with people in the foreground (virtually all my images have people in them) almost always get a little fill-flash so I set flash compensation in the camera to about -.5. That's just enough to get some sparkle in the subject but not enough to overwhelm the existing light.
I realize that not everyone has Photoshop but most decent image editors will give you some control over the "blues". However, it's always best to accomplish this as much as possible with the camera settings. That way you'll spend less time on the computer and more time taking pictures.


