Introduction
There is probably no question in portraiture that is more confusing to beginning photographers than how to photograph people with black skin. What exposure to use? Should you open up the lens? Should you stop down? What about lighting? Years back, for many photographers it was hard to pose these question, much less know where to go to get an accurate answer.
Uncertainty was the norm, and confusion ruled. Fortunately, in this day and age, it is a question that can be dealt with directly. It is simply a question of photographic technique for photographing subjects with dark skin, rather than a racially charged issue.
No one has a clearer explanation than our good friend and master portrait photographer Monte Zucker. As NYI students learn in Monte's portraiture videotape that is included in Unit Six of the Complete Course in Professional Photography, it's simple:
"If I am lighting a black person, I'm not going to change the light, I'm not going to bring it in any closer. I'm not going to open up an extra f-stop.
"The only thing I'm going to do is use the light coming from the side and around the subject. What we need to do when we're photographing a black person is to bring an extra light in from a 90-degree angle."
In essence, what Monte does with people of color is to wrap the light around the planes of their face, to make sure that heavy shadows do not obscure detail in the portrait subject. He recently wrote an article for Shutterbug Magazine and for the Web site he created along with master photographer Gary Bernstein, www.zuga.net.
Because Monte is a great teacher, a gentleman, and a good friend, he gave us permission to reproduce this article that appeared recently on his site. We thank Shutterbug Magazine for letting us reprint it as well. Thanks Monte, for all the confusion that your insights clears up!
My recent trip to Turks and Caicos in the Caribbean gave me opportunities that I hadn't expected. In particular, I photographed many black people - some wearing stark white - many against light, bright backgrounds. I thought that the contrast would be too much, especially using digital. It actually wasn't at all difficult. One just has to understand how to use the light.
My reason for being on the island was to consult with and teach the photographers at Beaches, an affiliate of Club Med. I was invited there by Andy and Krys Mann, co-owners of the photography franchise at the hotel. One of the portrait sittings that I did while I was there was for a mother and her two children. Of course, it's never quite as easy as one would want it to be, but that's part of the fun of being (1) a portrait photographer and (2) a teacher who welcomes all challenges.
I went on the trip with my Canon D30 digital camera, my Quantum flashes and several Westcott light modifiers. I was told that all of their work was done outside, so they didn't want me to bring lights. When I arrived I understood completely. The area offers backgrounds everywhere you turn. Most of them were completely unexplored by the photographers there before I arrived.
My favorite portrait location turned out to be a small area between two wings of motel rooms. No one would have ever thought to take pictures there, until I saw it and began working there. The walls were a pale pink. They actually took on different shades of color depending on the light. The area was open from above (a natural built-in hair light. One side was open to the parking lot (one of my all-time favorite choices for location photography). Depending on the time of day, you get either soft, reflected light thru the buildings or direct sunlight late in the afternoon.
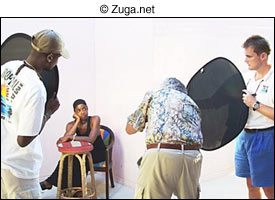
When the direct sunlight was coming into my studio had two people hold up a Westcott translucent panel. At the time of this sitting, however, the direct sunlight had not yet come in strong. My host, Andy, held up one of my Westcott Monte Illuminators (black side to me) protecting my lens from extraneous light.
Another reflector was used on the shadowed side of my subjects to bounce light across the faces of my subjects, creating the highlights on their dark skin. That's Preston Dickenson on my left, holding the reflector. Preston is Andy's partner in charge of all video production. He, too, was excited about what I was teaching. He stayed close-by the entire week.
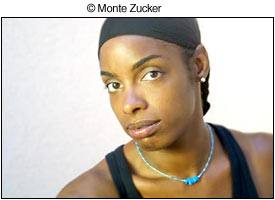
The light was very subdued. A lot of light wasn't required. But it needed to come from both sides, not just from camera position. That's the way you photograph dark skin.... by bringing in specular highlights from both sides. Nor is it necessary to open up the lens any more than usual. Light crossing over the skin brings out great highlights.
That's what I needed for these portraits. Lots and lots of highlights! Had I been using an exposure meter, I would have taken an incident meter reading with the reflector in place, pointing the meter towards the camera. As it was, all I had to to was to do a test shot on my D30 and go from there. I knew that the light background might make the image of the people too dark, so I overroad the camera by one f/stop and it worked perfectly.
I posed everyone in an L-shaped cove of two of the walls. Light was bouncing from all directions, but I added another silver reflector camera left to create more side lighting and sort of a main light. I pushed the ISO up to 400 on the camera, selected a wide open aperture (plus one extra f/stop) and let the camera do it's thing with the shutter speed. That's all there was to it.
The mother and little girl were dressed appropriately for the portrait. Her son, however, had a sweatshirt on with large lettering. I was afraid that it would be a terrible distraction in the picture, so I asked him to remove his shirt. Reluctantly, he obliged.
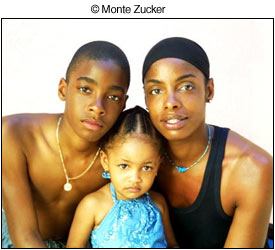
I began the sitting by placing the little girl on a stool, the mother and brother on both sides.
Before she knew what was happening I got a picture. Within seconds, however, she began to cry. This wasn't going to work. I looked on the back of my D30. I had a good picture, so I moved on.
I tried placing the daughter on the stool, her mother holding her. I could see that it wasn't going to work, so I told her to hold her daughter. Preston lit the child's face with his reflector, spot lighting her beautifully. It's amazing how that little reflector can direct light to a single spot when it's necessary.
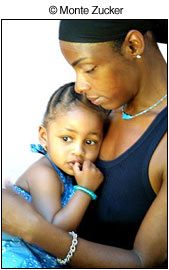
Again I tried to get her apart from her mother.
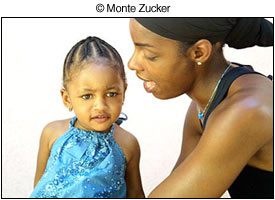
It just wasn't going to work. I moved on.
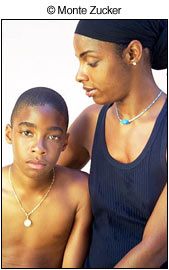
Since I had photographed the little girl with her mother, I did the same with the boy.
I directed the mother carefully to photograph her in provirtual against the simple background. I could see that this was going to be pretty easy, so I moved them in more closely for the next portrait.
My Westcott reflector is silver/black. The reason I like it is that it reflects back whatever the color the light is at that time. So, even though it appears to have been a gold reflector, make no mistake. The silver/black one is the only thing that I need and use.
Creating a portrait of the son was a lesson in lighting dark skin. As I moved the reflector from place to place I could see the highlights creating a fantastic sheen across his face. The reflector, then, became my main light, placing all the emphasis on his face and playing down his hands and body.
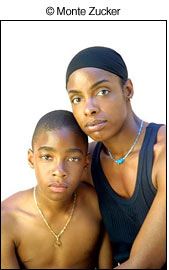
Photographing the mother was simple. I didn't feel that smiles were appropriate for any of them, since all the smiles I was getting from both of the children were terribly fake. Even the mother seemed to be more relaxed with this simple study of her.
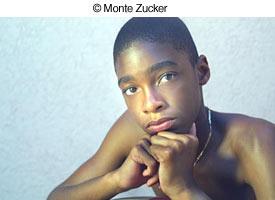
The late sun cast such a warm glow on her I was surprised, myself, that my silver reflector was doing such a great job.
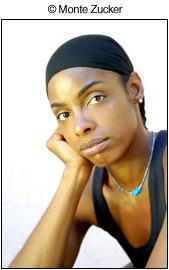
I tipped my camera extremely to my right to make her lower shoulder the higher shoulder. Don't ask me why. It just struck me that the composition looked great through the finder that way. Yes, I did a little retouching on these portraits in Photoshop.
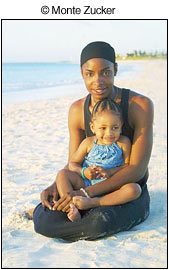
Soon afterwards, we were on the beach. It seems as if everyone on Turks and Caicos wants their portraits made on the beach. I found many other gorgeous surroundings, but the water there does have an incredible color, so I obliged. I did find, however, that the best beach portraits are always made very late in the day. Just before and after the sun sets. Otherwise, no one can keep their eyes open. These portraits were made just as the sun was setting.
This time, the speed of the camera's ISO was set to 800. It was that dark and I needed a somewhat fast shutter speed, since I was hand holding the camera for ease of movement. I knew that I didn't have a lot of time or a lot of chances.
My first picture of the mom and daughter appeared to be fairly successful. The little girl actually smiled! I moved on to the family group picture again, my fingers crossed, of course!
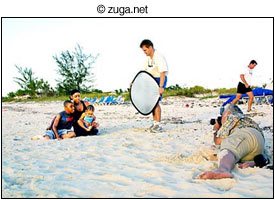
Here you can see where Andy was again holding the reflector, opening up the shadowed side slightly. The light was waaaay down by now. I positioned the family to form a pyramid composition and tried to stick with that. My low camera height positioned them low enough in the picture, so that the horizon line wouldn't cut them in half.
I didn't even try to get them to look at the camera at first. I was just thrilled that the little girl wasn't crying. I told everyone to look at her.
It was working. They looked out to sea. Counted the boats. Did everything, except stand on their heads to keep her happy. I even told her to pinch her brother's nose. She liked that.
And then, finally, she looked up at me and smiled. I smiled back...AFTER I snapped the shutter. I was happy. She was happy. Her mother was happy .... and so was Andy! What could be better?
You just wouldn't believe the low level of light under which we were working. I explained to all the photographers that it isn't the amount of light that counts. It's simply the angle at which the light come towards the faces of dark-skinned people. When you cross their faces with light you pick up incredible detail. These pictures should prove that to everyone.
By the way, I just wanted this little PS to give credit to all of Andy's crew who were so great for this week of classroom instruction. They were: Mike Slack, Shaun Tucker, Joan Burton, Betty Parker, Kendra Parker, Madicyn Villaobos and Anita Marcus. Sandra Been and Alexis Devonish were manning the Tour Desk. Nikki Hanna was the wonderful wedding coordinator who kept everything flowing smoothly. Thank you one and all!
By the way, you can always see a lot more of my photographic instruction on the web site that Gary Bernstein and I share, www.zuga.net.


